What’s my apps agent string? Well that depends…
Hybrid apps (apps that include native content and web content) are becoming more popular by the day. One question that naturally follows development of a hybrid app is “What’s the agent string so I can track it?”
Unfortunately there isn’t as simple one line answer to this question because of the way our platform has evolved over time. On the phone, for example, we send manufacturer and model information about the device in use. But beyond hardware we’ve also had an evolution in development platforms. At our //Build conference this year we announced the new Universal App model, which more or less allows you to run Windows 8 apps on your phone. In most cases this supersedes the classic Silverlight model but we still need to let web sites know the environment they’re running in so that they can tailor their experience accordingly.
Below is a list of agent strings for our current OS’s and dev platforms as of 5/14/2014. When this changes in the future I’ll try to come back and update this post. I’ve highlighted the changes in the agent strings for each scenario as compared to the “traiditional” mode for that platform. Below the agent strings you’ll find more notes about special cases and I even include bonus information at the end on how to test your site for Windows Phone using only your desktop browser!
Windows 8.1
IE Traditional (Desktop) Mode
Mozilla/5.0 (Windows NT 6.3; WOW64; Trident/7.0; Touch; rv:11.0) like Gecko
IE in "Modern" Mode
Mozilla/5.0 (Windows NT 6.3; Win64; x64; Trident/7.0; Touch; rv:11.0) like Gecko
Universal App WebView (C#)
Mozilla/5.0 (Windows NT 6.3; WOW64; Trident/7.0; Touch; WebView/2.0; rv:11.0) like Gecko
Universal App WebView (JavaScript)
Mozilla/5.0 (Windows NT 6.3; Win64; x64; Trident/7.0; Touch; MSAppHost/2.0; rv:11.0) like Gecko
Windows Phone 8.1
IE in Traditional (Mobile) Mode
Mozilla/5.0 (Windows Phone 8.1; ARM; Trident/7.0; Touch; rv:11.0; IEMobile/11.0; <manufacturer>; <model>) like Gecko
IE in Desktop Mode
Mozilla/5.0 (Windows NT 6.2; ARM; Trident/7.0; Touch; rv:11.0; WPDesktop; <manufacturer>; <model>) like Gecko
Universal App WebView (C#)
Mozilla/5.0 (Windows Phone 8.1; ARM; Trident/7.0; Touch; WebView/2.0; rv:11.0; IEMobile/11.0; <manufacturer>; <model>) like Gecko
Universal App WebView (JavaScript)
Mozilla/5.0 (Windows Phone 8.1; ARM; Trident/7.0; Touch; MSAppHost/2.0; rv:11.0; IEMobile/11.0; <manufacturer>; <model>) like Gecko
Silverlight App WebBrowser
Mozilla/5.0 (Windows Phone 8.1; ARM; Trident/7.0; Touch; rv:11.0; WebBrowser/8.1; IEMobile/11.0; <manufacturer>; <model>) like Gecko
Desktop Mode for IE on Phone
IE on Windows Phone has an option to render sites as the desktop version under settings.
Many users prefer this mode, especially users with larger screens.
Universal Apps
These are new to Windows Phone 8.1. Going forward, this is the mode that most developers will chose to use. Silverlight is the "classic" model in use today.
C# vs JavaScript
It’s interesting to note that there is a difference in agent strings when building an app with C# vs JavaScript. The agent string changes from WebView to MSAppHost. This is due to the fact that in Xaml apps the content is presented in a control that renders HTML whereas in HTML apps it’s just an area with different sandbox rules.
Simulating IE for Windows Phone on the Desktop
IE 11 and 12 on the desktop have the ability to simulate IE for Windows Phone pretty closely. To simulate Windows Phone IE (and use the desktop debugging tools in all their glory):
- Start IE
- Press F12
- Scroll down to the last tab in the dark bar on the left (Emulation) and set:
- Document Mode: 10
- Browser profile: Windows Phone
- User Agent String: IE10 – Windows Phone
- Orientation: Portrait
Note: These options will change going forward as IE for phone moves up in version numbers.
Share Your Phone with the World
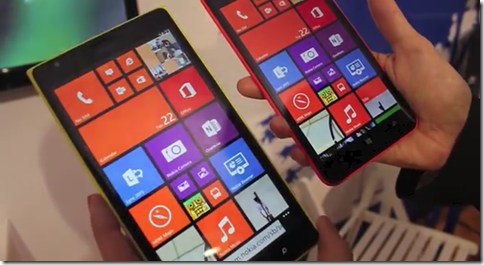
Windows Phone market share is growing rapidly worldwide. As more our family members pick up Windows Phones it’s likely that at some point we’ll get asked to teach them how to use a particular feature. With that in mind, if you haven’t seen Nokia Beamer yet definitely check it out. It allows you to wirelessly and for free transmit your Nokia phone screen to any browser in the world.
You can transmit from your phone to desktop browser as seen here and you can transmit from your phone to another phone as seen here.
Only the sender has to be a Nokia phone, the recipient can be any device. But obviously if your family member has a Nokia it will be helpful that they can share their screen back with you.
Those videos show more latency than I have personally experienced. From phone to PC I saw about 1 to 1.5 second lag time and up to 4 frames per second. Obviously phone to phone speeds will vary depending on the cellular network speed.
If you or the person you’re connecting with has a small data plan you can also turn off “auto refresh” mode and simply shake the phone to send a single frame. Now that’s cool!
Linking Your App to the Wallet
So Windows Phone has an integrated wallet experience, but why would you want to link it to your app? Well if you’re a financial institution of course you might want to enable payments with your cards. But even if you’re not a bank and your app offers deals, coupons, a membership or even stored value, integrating with the wallet give the user increased visibility to your offers. Oh, and did I mention free promotion in the wallet app – even if your app isn’t installed?
Adding Wallet support is actually quite easy, especially if the app doesn’t need to update the wallet when it’s not running.
The first step is to add the wallet capability to the app. This can be done by double-clicking on WMAppManifest.xml (under Properties), switching to the Capabilities tab and checking the ID_CAP_WALLET checkbox.

Don’t check the other two wallet-related boxes unless you want to add real payment options (e.g. Visa credit cards) that can be used to buy music, apps, etc. These boxes don’t need to be checked for membership cards (like a Starbucks card).
Note: If a financial app does want to add payment cards it will need to pass a few extra certification requirements with the Windows Phone store.
Next we need to register our app as an extension to the wallet. Unfortunately there isn’t a way to do this in the UI so we’ll need to save our work, right click on WMAppManifest.xml and choose ‘View Code’. After the closing </Tokens> tag, add an Extensions block like this:
<Extension ExtensionName="Wallet_app_membership" ConsumerID="{5B04B775-356B-4AA0-AAF8-6491FFEA5683}" TaskID="_default"/>
</Extensions>
ConsumerID and TaskID will never change – they’re always those values. But ExtensionName might change depending on how you want to interact with the wallet. The choices are:
- Wallet_app_other – for non-specific Wallet items
- Wallet_app_loyalty – for loyalty cards
- Wallet_app_membership – for membership cards
- Wallet_app_transit – for transit cards
- Wallet_app_payment – for payment cards
Wallet_app_membership is a good choice for most applications, and if you want to register support multiple extensions you could do it like this:
<Extension ExtensionName="Wallet_app_membership" ConsumerID="{5B04B775-356B-4AA0-AAF8-6491FFEA5683}" TaskID="_default"/>
<Extension ExtensionName="Wallet_app_loyalty" ConsumerID="{5B04B775-356B-4AA0-AAF8-6491FFEA5683}" TaskID="_default"/>
</Extensions>
Now save WMAppManifest.xml and when you submit your app to the store it will start getting promoted in the wallet app. That’s a tremendous advertising advantage!
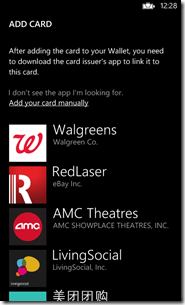
The last thing we need to do is have our application add a card to the wallet. Up to this point we’ve given the app the ability to interact with the wallet and gotten our application advertised there, but there’s still no link from the wallet back into our app once it’s installed. Don’t worry, the card you create can simply be a membership card. It doesn’t have to report a live credit balance (though it can if you want it to). You might just want to display a logo and give the user the ability to launch the app. Of course this is a great place to add customer support information like e-mail addresses and phone numbers, and you might want to display a QR code for example to identify the user at a retail store. It’s up to you how much information you want to add, but the WalletTransactionItem documentation gives you a listing of what’s possible.
When your app adds the card is up to you, but a good place to ask is on application launch. Of course if the user declines the card we don’t want to ask again (though we probably want to give them the option to add it later via a button or menu item). Also keep in mind that the membership card might have already been added so we want to make sure it doesn’t exist before we try to add it again.
Finally, there are some slightly unusual requirements we need to knowing about the card logo image. First of all, the card actually needs three image sizes (336×336, 159×159 and 99×99). Luckily we can supply one large image for all three sizes and the system will resize it for us. The more important requirement is that the image has to be fully loaded before the request is made to add the card. Most people don’t know that passing a URI into the constructor of BitmapImage doesn’t load it right away. It kicks off a background task to load the image and you’ll get an exception if you try to add your card before this task completes.
There are a couple of workarounds but the easiest one is to store the image as a resource and load it as a stream. Don’t forget to set the Build Action in the property window to ‘Embedded Resource’ instead of ‘Content’, which is the default.
Here is one possible method for adding a membership card:
{
// If the membership already exists, just ignore
var existing = Wallet.FindItem("MainMembership");
if (existing != null)
{
Debug.WriteLine("Membership card already exists; not adding again.");
return;
}
// We have to load our image before we can create the membership
// Otherwise adding the membership will fail
var logoImage = new BitmapImage();
using (var stream = Assembly.GetExecutingAssembly().GetManifestResourceStream("PhoneWalletTest.Images.Logo336.png"))
{
logoImage.SetSource(stream);
}
// Create membership card
var membershipItem = new WalletTransactionItem("MainMembership");
membershipItem.DisplayName = "Sample Membership";
membershipItem.IssuerName = "Sample Business";
membershipItem.IssuerPhone.Business = "(###) ###-####";
membershipItem.IssuerWebsite = new Uri("http://www.samplebusiness.com");
membershipItem.BillingPhone = "(###) ###-####";
// All three logo sizes must be set, but they can automatically be
// resized from a larger one.
membershipItem.Logo336x336 = logoImage;
membershipItem.Logo159x159 = logoImage;
membershipItem.Logo99x99 = logoImage;
// Create a task to add the card and subscribe to the completed
// event so we know if anything went wrong.
var addItemTask = new AddWalletItemTask();
addItemTask.Completed += addItemTask_Completed;
// Set the membership as the item and show the task to add the card
addItemTask.Item = membershipItem;
addItemTask.Show();
}
We also need the event handler for when the task completes. This is so we can inform the user if something went wrong and it’s also a good place to store a flag if the user chooses to decline the card:
{
if (e.TaskResult == TaskResult.OK)
{
Debug.WriteLine("Membership card added.");
}
else if (e.TaskResult == TaskResult.Cancel)
{
Debug.WriteLine("User declined membership card.");
// Remember that the user cancelled so we don't ask them again
IsolatedStorageSettings.ApplicationSettings["MembershipCardCanceled"] = true;
IsolatedStorageSettings.ApplicationSettings.Save();
}
else if (e.Error != null)
{
MessageBox.Show(string.Format("Problem adding membership card {0}", e.Error));
}
}
Now we can call EnsureMembership from the page Loaded event or from a button click. In the loaded event we only want to call it automatically if the user hasn’t declined the card before.
{
// Make sure the user hasn't previously declined the card
// before we try to add it again.
if (IsolatedStorageSettings.ApplicationSettings.Contains("MembershipCardCanceled"))
{
Debug.WriteLine("User declined to add card previously. Not attempting to add again.");
}
else
{
EnsureMembership();
}
}
And finally, we can call the same method from a button click without checking for a previous decline (since the user is actually making the request).
{
EnsureMembership();
}
These are the basic steps needed for wallet integration and the sample code can be downloaded here. If you’d like to know more about the wallet like payment cards and updating the wallet in the background, I highly recommend this video on Channel 9.
Where is Santa?
If you were nice this year (or maybe even a little naughty), Santa and his elves are preparing something just for you. But how will you know when jolly old Saint Nick leaves the north pole? And how do you know what time you need to be fast asleep? With Where is Santa for Windows Phone and Windows 8 of course!
So grab the apps and a cup of hot chocolate. Set out the cookies and watch to see when Santa is on his way to see you!
Where is Santa for Windows Phone
Fixing Color Themes on Windows Phone
There’s a lesser-known feature of Windows Phone that allows customization of control colors without touching their Style or Template. This is accomplished by overriding special color resources defined by the OS. In fact there’s a whole page on MSDN dedicated to listing the color resources and how they’re used by various controls.
For example, adding this to App.xaml:
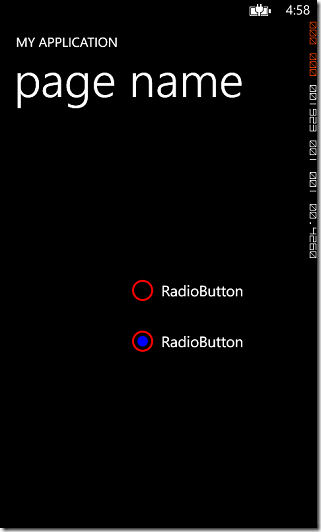
<SolidColorBrush x:Key="PhoneRadioCheckBoxBorderBrush" Color="Red"/>
<SolidColorBrush x:Key="PhoneRadioCheckBoxCheckBrush" Color="Blue"/>
</Application.Resources>
Produces this in the designer:
And in Windows Phone 7.0 that’s what you see at run time too. However, starting with Windows Phone 7.5 the colors DON’T display correctly at run time. At run time the color changes lost and the default OS colors are used instead.
This is a known issue and it’s discussed several places, but the article I like best is Windows Phone Mango Custom Application Theme Step-by-Step. I like the workarounds they provide too, especially Option1: Dynamically load all colors from a XAML file. With this approach, color resources are moved to an external file then loaded in at run time. The problem I have with their implementation is that it breaks the design experience since it does not allow these resources to be merged during design. So I set off to provide a simple solution that would work at both design time and at run time.
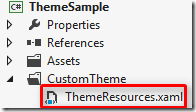
My solution starts in a similar way by adding a resource dictionary to the application that will contain the color theme:
I put mine in a subfolder but that’s just a matter of taste.
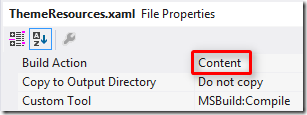
Next, we change the Build Action of this file to ‘Content’ instead of ‘Page’ (more on that in a moment).
Now we need to move all of our color resources out of App.xaml and into this resource dictionary. Here’s what mine looks like after the move:
xmlns="http://schemas.microsoft.com/winfx/2006/xaml/presentation"
xmlns:x="http://schemas.microsoft.com/winfx/2006/xaml"
xmlns:System="clr-namespace:System;assembly=mscorlib">
<SolidColorBrush x:Key="PhoneRadioCheckBoxBorderBrush" Color="Red"/>
<SolidColorBrush x:Key="PhoneRadioCheckBoxCheckBrush" Color="Blue"/>
<SolidColorBrush x:Key="PhoneRadioCheckBoxPressedBrush" Color="Green"/>
<SolidColorBrush x:Key="PhoneButtonBasePressedForegroundBrush" Color="Yellow"/>
</ResourceDictionary>
Finally – and this is one of the differences in my approach – we go back to App.xaml and merge this resource dictionary back in:
<Application.Resources>
<ResourceDictionary>
<ResourceDictionary.MergedDictionaries>
<ResourceDictionary Source="CustomTheme/ThemeResources.xaml"/>
</ResourceDictionary.MergedDictionaries>
<local:LocalizedStrings xmlns:local="clr-namespace:ThemeSample" x:Key="LocalizedStrings"/>
</ResourceDictionary>
</Application.Resources>
Now build the application and when you view the page in the Visual Studio (or Blend), you’ll see the color changes applied:
We’re not quite done yet though because the changes are still lost at run time. So what did we gain by moving the resources to a separate dictionary? We got the ability to update them quickly and easily at runtime using a little code.
In the sample code you’ll find a file called ResourceExtensions.cs. With this added to our project we can call one line of code and our colors are fixed at run time too. The method is called MergeColors and it’s an extension method added to the ResourceDictionary class itself. This method needs to be called inside the App() constructor. It should be called after InitializeComponent() but before InitializePhoneApplication(). Here’s a snippet:
/// Constructor for the Application object.
/// </summary>
public App()
{
// Global handler for uncaught exceptions.
UnhandledException += Application_UnhandledException;
// Standard XAML initialization
InitializeComponent();
// Merge custom colors
App.Current.Resources.MergeColors(new Uri("/CustomTheme/ThemeResources.xaml", UriKind.Relative));
// Phone-specific initialization
InitializePhoneApplication();
…
MergeColors first looks to see if the specified resource dictionary is already merged into the application (which it should be, since we merged it above so we can see our colors at design time). If the dictionary is merged it’s removed. Otherwise, it’s loaded into memory. Finally, each of the color resources is updated in the parent dictionary.
Now we have our custom colors at both design time and run time.
So, why did we change the Build Action above to ‘Content’ instead of ‘Page’? It’s because the Uri for a ‘Content’ dictionary is much closer to the Uri at run time. That makes it easier for MergeColors to see if the dictionary is merged at runtime and remove it.
That’s everything you need if you download the source. For completeness and for those who would rather copy and paste than download, here’s what’s inside the MergeColors extension method:
{
// Validate
if (dictionary == null) throw new ArgumentNullException("dictionary");
if (resourcesUri == null) throw new ArgumentNullException("resourcesUri");
// Check to see if the resources are currently merged
var resources = (from r in dictionary.MergedDictionaries
where resourcesUri.OriginalString.Contains(r.Source.OriginalString)
select r).FirstOrDefault();
// If resources are currently merged, remove them
if (resources != null)
{
dictionary.MergedDictionaries.Remove(resources);
}
// Otherwise, load them
else
{
resources = new ResourceDictionary { Source = resourcesUri };
}
// Loop through all color entries defined in the resource file
// If the same entry is found in the target dictionary, update its value
foreach (DictionaryEntry entry in resources)
{
// Try to get source and target values as color brushes
var colorBrush = entry.Value as SolidColorBrush;
var existingBrush = dictionary[entry.Key] as SolidColorBrush;
// If both were found, update
if (existingBrush != null && colorBrush != null)
{
existingBrush.Color = colorBrush.Color;
}
}
}
Improve your ratings the free and easy way with App Promo
The Problem with Ratings
It’s no secret that apps with higher ratings (and more of them) receive better placement in the store. Better placement means more downloads, and more downloads means more money. But part of the problem with ratings is that people rarely think about doing them. And when they do, it’s usually because they’re either really satisfied or really dissatisfied. InfoSurv, a company that provides market services to companies like CocaCola, Nestle and Emerson, has this to say in their FAQ:
There is a observed response bias in customer satisfaction surveys towards the customers on either extreme of the satisfaction scale, particularly those who are very dissatisfied. In other words, very satisfied or dissatisfied customers are more likely to respond to a survey invitation than those more towards the middle. The best way to combat the resulting “polarization” of customer survey data is to assure the maximum survey response rate possible, thus capturing more of the ambivalent customers and making the customer survey responses more representative of the overall customer base.
So as app developers we have to solve two problems: 1) Getting more users to rate our apps and 2) Finding happy customers.
Solving the Rating Problem
Obviously it doesn’t make sense to ask someone for a rating on the first application run – the user wouldn’t know what to say! On the other hand, if a user continues to use an app over time we can infer that they’re getting value out of the app. Therefore it’s repeat users who we want to ask for ratings.
With that in mind, a rating reminder should:
- Keep track of the number of times the application has been run. – It helps us find happy users.
- Keep track of whether the user has already been asked to rate the application. – So we don’t keep bugging them if they’ve already rated or said they don’t want to rate.
- Bonus: Keep track of the number of days since an application was installed. – Valuable for short-lived or seasonal applications. For example, a Christmas application might want to remind after two days regardless of usage since after December 25th they won’t use it again for a year.
- Bonus: Have the ability to display the reminder in the local language. – Important for applications that support multiple languages.
The code to implement these features isn’t overly complex but it does involve several components (storage, dialogs, marketplace APIs, localization, etc.). It’s also boilerplate – meaning it’s the same across applications. That makes it a great candidate for being factored into a library.
App Promo
App Promo is a tiny control library for Windows Phone and Windows 8 created to help with promoting applications. Right now it contains one control – RateReminder – and by now you probably have a good idea of what it can do for you.
RateReminder has four main properties:
- RunsBeforeReminder – The number of application runs before the reminder will be displayed. The default is 7.
- DaysBeforeReminder – The number of days before the reminder will be displayed. The default is zero (disabled).
- TryReminderOnLoad – true if the control should try to show the reminder as soon as it’s loaded; otherwise false. The default is true.
- CustomReminderText – The customized reminder message to display to the user. The default is null (which means the control will use its built-in localized message).
As you can see, RateReminder is configurable but its default settings mean you can drop it on your main page and forget about it. And since App Promo is available as a NuGet package, there’s no reason not to add it to your app today!
Using App Promo
Let’s take a look at how to add App Promo to a project. I’ll be showing App Promo for Windows Phone, but the steps are the same for Windows 8 (just using a different NuGet package).
- Before we get started we need to make sure you have NuGet installed. In Visual Studio click on Tools –> Extensions and Updates. If you see NuGet in the list you’re already set. If not, type NuGet in the search box and install it (a restart of Visual Studio will be required).
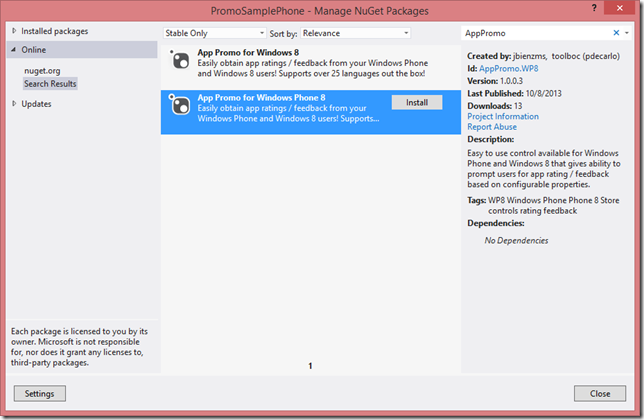
- Next we need to install the App Promo NuGet package. You can do this through the Package Manager Console but I prefer to use the GUI. In Solution Explorer, right-click on your project and choose ‘Manage NuGet Packages’.
- Make sure the ‘Online’ branch is selected on the left and type ‘AppPromo’ (no spaces) in the search box.
- Click the ‘Install’ button next to App Promo for Windows Phone 8 (or for Windows 8 if you’re building a Windows 8 app) and when the installation completes, close the NuGet window.
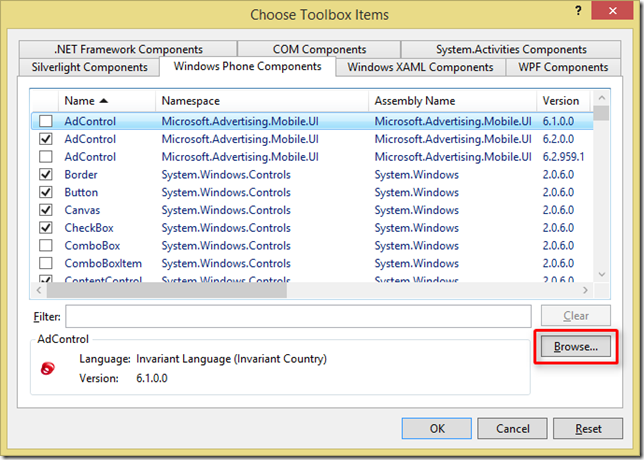
- Expand the toolbox if it’s not already expanded, then right-click and select ‘Choose Items…’. In the window that pops up, click the ‘Browse’ button.
- Navigate to your project folder, then to packages –> AppPromo.WP8.#.#.#.# (or AppPromo.Win8.#.#.#.#) –> lib –> wp8 (or winrt45).
- Double-click on AppPromo.WP8.dll (or AppPromo.Win8.dll) and click OK. The RateReminder control should now appear in your toolbox.

- Drag the RateReminder control onto the first page of your application (this is usually MainPage.xaml or GroupedItemsPage.xaml).
NOTE: The RateReminder control is completely transparent and has no appearance. You’ll want to remember where you placed it or use Xaml view or Document Outline if you need to select it.
- Optional: Change the number of runs (default 7) or the number of days (default 0 – disabled).
- You’re done! You just added a rating reminder to your application.
NOTE: App Promo has been added to your project but NuGet can’t add the control to your toolbox. We need to do that before you can drop it on your page.
Testing the RateReminder Control
Testing the RateReminder control is easy. Just remember that the application has to be closed and re-launched in order to be considered a “run” (otherwise the user is just fast switching). In Visual Studio you can quickly simulate a close and a re-launch using the Restart button:

If you don’t have Visual Studio attached you can use the phones hardware Back button to leave the app and then launch it again. For Windows 8, use the Reset button above or drag the window to the bottom of the screen to close the app between runs.
Important Note!: On Windows 8.1 apps are not actually closed unless you hold them at the bottom of the screen until they flip over (about 3 seconds).
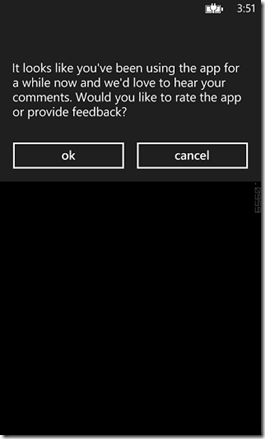
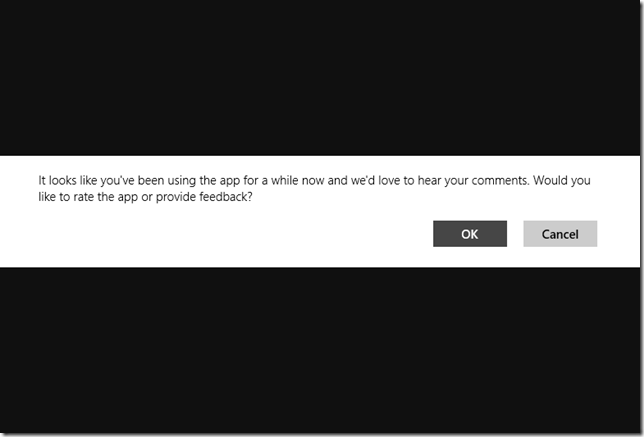
After 7 runs (or however many you configured), the rating reminder will be shown:
Tapping OK will display the rating page if the application is already in the store. Otherwise, you’ll see an error message telling you that the application is not currently available.
Usage Statistics
RateReminder provides a small amount of usage statistics through the TryReminderCompleted event (if run automatically on load) or through the asynchronous result returned from TryReminder (if called manually). Both return an instance of the RateReminderResult class, which provides the following usage statistics:
- Runs – The number of times the application has been run since it was installed. This count is only calculated if the runs reminder is enabled and hasn’t already been shown.
- Days – The number of days that have passed since the app was installed. This count is only calculated if the days reminder is enabled and hasn’t already been shown.
- ReminderShown – true if a reminder was shown on this attempt.
- RatingShown – true if the user accepted the reminder and the rating interface was shown on this attempt.
The source code includes a sample that displays usage statistics. It’s important to note that the counter will read zero after the reminder has been shown. This is to avoid the cost of reading and updating settings after the reminder has been displayed.
The counters can be reset by calling the ResetCounters method on the RateReminder control. This will cause the reminder to be displayed again, which may be desirable after the application has been upgraded to a new version.
Localization
App Promo has been translated into more than 35 different languages, but it’s important to know that your app must also be localized for these languages to be shown. This is because the resource loader tries to be as efficient as possible. For example, when your application is run on a device set to Spanish, the resource loader will look for Spanish resources in your application. If it doesn’t find them, it won’t continue to look for Spanish resources when it loads the App Promo library.
Localizing your application is beyond the scope of this article, but as soon as your app is localized App Promo will show up as localized too. By far the easiest way to localize your application is using the Multilangual App Toolkit. This article is one of the best written guides I’ve found, and the Introduction and Testing videos are both excellent resources for getting started quickly.
Finally, if you see a translation error please feel free to create a pull request and fix it yourself or submit an issue with the corrected translation. Thanks!
Source Code
The source code for App Promo is available on on GitHub and includes two sample applications. Don’t forget that App Promo is already ready-to-use on NuGet. Here are direct links to the Windows 8 and Windows Phone 8 packages.
Special Thanks
I’d like to extend a special “Thank You” to my co-worker and friend Paul DeCarlo. Paul created the NuGet packages for App Promo and he’s got a lot of experience when it comes to marketing Windows Phone and Windows 8 apps. I highly recommend you check out his blog post on Monetizing your app with AdRotator.
App Enthusiasts released for Windows Phone and Windows 8
Today marks the launch of the App Enthusiasts application for Windows 8 and Windows Phone!
From the app description:
"App Enthusiasts showcases applications created by developers around the world on Windows Phone and Windows 8. Stay up to date with the coolest creations by students, indie developers, and companies in your area. App Enthusiasts can filter apps by region, country, state and city, and it even keeps track of the apps you’ve seen across all of your devices! Microsoft employees are using App Enthusiasts to showcase apps at local events around the world, so if you’re interested in having your application promoted or if you’d like to find out about Enthusiast events in your area, please email AppEnthusiasts@Microsoft.com."
What is exciting is that App Enthusiasts is more than just an app, it is a movement to bring visibility to applications created by Windows Phone and Windows 8 devs. Microsoft field employees are planning to host events at Microsoft retail stores across the U.S. At these events, developers featured in App Enthusiasts share their creations and speak to the audience about their inspiration. We believe that an application like this can help create a community of supportive developers and fan interest alike. I certainly suggest reaching out to AppEnthusiasts@Microsoft.com if you have an app that you would like featured in this program! Seriously, we want your best work to shine!
Let’s take a look at the app itself:
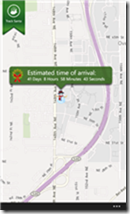
Upon launching either version of the app, the user is asked to authenticate with their Live credentials and is then greeted with a listing of applications organized by date:
Users can see at a glance what City, State, and Country an app has been published in. Upon clicking an item, the user will be brought to the download page in the marketplace for the selected app. When an item has been viewed, a checkmark appears next to the item indicating that it has been seen.
With these applications it’s really easy to discover cool apps from my region. By setting the filter to my city I was able to see creations from people in my area. From here I could easily install apps built by people I’ve actually met in the field. Being able to curate and find their work made it incredibly easy for me to provide feedback and ratings. It is a really great way for me to keep in touch with my community and help promote the Windows ecosystem. If you want to know more about the upcoming events and how to showcase your app, send an e-mail to AppEnthusiasts@Microsoft.com.
Enjoy!
How-To: Show Features Only in Beta Builds
I was recently asked how to add a “Submit a Bug” feature to an app but only make it visible for Beta builds.
The code to actually send the bug was quite simple:
EmailComposeTask emailComposeTask = new EmailComposeTask();
emailComposeTask.Subject = "My App Feedback";
emailComposeTask.To = "feedback@mydomain.com";
emailComposeTask.Show();
Now the question is where to put it. Obviously this could be triggered from a button click, a menu item, or any other control on the screen. But if we only want the item to show up on beta builds we have some extra work to do.
One of the ways I like to deal with this is by adding a new configuration to the Configuration Manager.
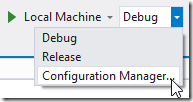
In Visual Studio click the Configuration drop-down and choose ‘Configuration Manager’.
In Configuration Manager, choose to create a new configuration.
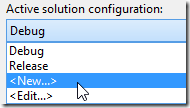
Call the configuration ‘Beta’ and choose to copy settings from Release.
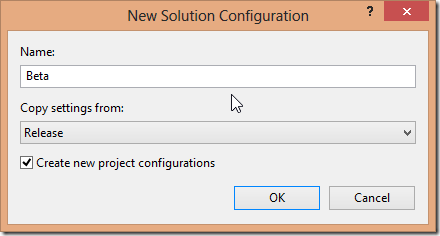
Click OK to close the dialog.
Make sure ‘Beta’ is selected in the configuration drop-down.
Right click on the project and choose ‘Properties’.
Switch to the ‘Build’ tab.
Add a new conditional compile symbol called BETA.
Close the project properties window and make sure you saved your changes.
Now, anywhere in the code you can use BETA as a conditional compile statement.
#if BETA
contactButton.Visibility = Visibility.Visible;
#endif
Now you can easily switch between Debug, Release and Beta builds using the configuration drop-down at the top in Visual Studio!
How Supported Rotations REALLY Work in Windows Store Apps
Apps can specify that they prefer portrait or prefer landscape in their appxmanifest by checking one or more boxes:
However, the app is not guaranteed to get the preferred orientation. The classic example is a game that requests portrait but is being run on a desktop machine with a monitor that cannot be rotated. The game will be forced to run in landscape instead and it’s up to the game to deal with this (e.g. letterboxing or putting content on the sides of the otherwise vertically laid out game).
At //build it was clearly stated that with 8.1 and the smaller 7” devices, most users prefer to hold the device in portrait. Of course in this scenario the device is portable and the OS knows that the device can be rotated, so if an app requests to run in landscape the OS would honor it. But be aware that it’s still possible for an app to get locked in portrait too. It’s less common but can happen. On my old desktop rig I ran dual 27” monitors where one was landscape and the other was portrait. On that machine if I ran store apps on the portrait monitor, the OS would force them to run in portrait.
In summary, you can ask for whatever orientation you want but be prepared not to get it.
For more information see the InitialRotationPreference element.
Windows 8 Pro vs. Windows 8 RT
A developer contacted me just after the //build conference asking “I’m a new developer for Windows 8 coming from an iOS development environment. I was looking to purchase an inexpensive Windows 8 Tablet so I contacted [a vendor] to try to understand their offerings.” Unfortunately the vendor didn’t do a good job explaining the differences between Windows 8 Pro and Windows 8 RT. Since I know that’s been confusing from the beginning, I decided to turn my reply to this developer into a blog post that others can share.
There are three main technical differences between Windows 8 Pro and Windows 8 RT:
- Windows Pro devices use x86 or x64 CPUs (Intel and AMD) while RT devices use ARM (Qualcomm and NVidia)
- Windows Pro devices come with little or no software pre-installed, while RT devices come with Microsoft Office
- Windows Pro devices allow applications to be installed from the store and to the desktop, while Windows RT devices only allow store applications to be installed.
So RT devices have very long battery life thanks to ARM, and they can do a lot of the same things Pro laptops can do since they run the same store apps and they come with Office pre-installed. However, since RT devices don’t run x86 and since you can’t install “desktop” apps on them, you can’t install programs like Visual Studio or Photoshop.
The easiest way to summarize:
- Pro is for laptops and desktops and getting “heavy lifting” done.
- RT is for “light” work like e-mail, games, browsing, movies, fun.
You can think of RT as a direct competitor to the iPad but with a shockingly large number of features you previously had to buy up to a full laptop to get (Windows, Office, USB, ability to Print, Flash in the browser, Networking, etc.)
I hope that helps
![clip_image001[10] clip_image001[10]](https://jaredbienz.files.wordpress.com/2014/05/clip_image00110_thumb.jpg?w=352&h=306)
![clip_image002[10] clip_image002[10]](https://jaredbienz.files.wordpress.com/2014/05/clip_image00210_thumb.jpg?w=402&h=294)




![image[8] image[8]](https://jaredbienz.files.wordpress.com/2013/10/image8_thumb.png?w=644&h=367)


You must be logged in to post a comment.